Spoiler: Pros and Cons (Compiled by Lynx), and Contributed Tips
--MS Paint-- (iMac Version)
Pros:
-Intuitive Interface
-Many Ways for Clean and Easy Recolor
-Numerous Simple but Extremely Useful Tools
-Probably the Best Tool for Sprite Edits
-Free
Cons:
-While using the pencil, paintbrush, or eraser tool, if you hold the tool down by left clicking and then using the scroll wheel on your mouse, it will draw a line that cannot be undone.
-when you use the eye dropper tool, when you try and grab a color into your primary color you of course left click, but, what I stress to you DO NOT, while holding the left click mouse button with the eyedropper tool, right click at the same time! It will completely undo your last change and you can't Redo it! (Thanks, Percei!)
Used by: Lynx, Shadoninja, Percei, Super Judge Bro
Tips: -So, say you have a sprite with three colors (Bright, Medium, and Dark, same configuration on almost all PW1-3 Sprites, not so much on GS4 sprites), but it's all spread out across the outfit, well first things first, find the color you want for each of the three colors (I will usually get it from another outfit from a sprite I have C&Ped elsewhere on the canvas), using the eyedropper tool, put the color you want in the Primary Color Box, and the color you want to replace in the Secondary Color Box. Using the box select tool, drag out a square around the outfit of the sprite's outfit, and then press Ctrl-X and your outfit will dissappear, FRET NOT! Now, click the bucket fill tool and fill the box of color that was left from the Ctrl-Xing (Left Click). Then press Crtl-V and drag the pasted sprite over the box of color, make sure the box is completely gone. Just repeat this process for your other two colors and Voila, a brand new outfit (Note this doesn't work with every sprite.)(Also Note: You can do this with skin recolor usually, but not so much on hair, maybe a few hairstyles though.)
-Put the color that you want the originial color to change to as the secondary color (right mouse button) and the color you want to change from as the left mouse button/primary color, you can just hold the RMB and run it over the picture using the eraser to completely recolor.
(thanks, Shadoninja!)
--GIMP--
Pros:
-Free
-Uses Layers to Help with Easy Editing/Re-Editing
-Small Learning Curve for the Tools
-Open Source
-Supports Nearly Every Image Type
-Simple Animation, with Adjustable Frame Rates
-Numerous Picture and Edit Effects to Play WIth
-Settings Carry Over Everytime You Update
-Used by Numerous People on the Forum.
-Tablet PC Compatible
Cons:
-When First Opened, Numerous Floating Windows
-Larger Learning Curve for Sprites
-Help File is a Seperate Download.
Used by: Donald Serrot, Percei
(Thanks for all of the info, Don!)
--Usenti--
Pros:
-Easy recoloring
Cons:
-.png and .gif support only
-Only 256 colors
Used by: Neon Lemmy Koopa
--Unfreez-- (animator)
Pros:
- Small file size, so that you don't have to download the large Photoshop or Gimp just to animate stuff.
- Completely free.
- Pretty straightforward to animate.
- Allows you to set almost any frame speed.
Cons:
- Requires images to be GIF to be animated, but I guess that isn't much of a problem.
Used by: Super Judge Bro
--Photoshop--
Pros:
-Compatible with a tablet, both pen and eraser side, very useful for rough sketching and planning
-Compatible with very many image formats
-Layers, easier to edit if you have certain things in separate layers
-Very many tutorials for using Photoshop anywhere online, including spriting tutorials
-Comes with ImageReady for animation
Cons:
-Expensive, hard to find "free"
-Takes up a lot of hard drive space, probably not worth the money for someone that just wants to do spriting
Used by: Ellescene
--GraphicsGale--
Pros:
-There's a free edition, and if you really like it, you can choose to pay for the full version
-Layers, easier editting
-Fairly easy to understand and use
-Comes with animation options
-Recoloring tool
Cons:
-Free edition isn't compatible with .gifs
-Some limited options in free edition
Used by: Ellescene, BigFish
--Adobe Fireworks--
Pros:
-easy animation
-simple to use
Cons:
-for larger scale projects (not sprites)
-poor mechanics
Users: Lottie, Yuanfang, Harumi Fey
--Paint.net.--
Pros:
-Free
-Almost as many features as PhotoShop.
-Very easy to understand.
-Supports layers, transparency, etc.
-Pretty good for sprite editing, depending on what settings you have the tools on.
-Very easy to navigate.
Cons:
-More for photo editing than sprite editing, due to some transparency editing things.
-Not as many features as PhotoShop.
-Kinda low on Filters.
Users: Emiga
Pros:
-Intuitive Interface
-Many Ways for Clean and Easy Recolor
-Numerous Simple but Extremely Useful Tools
-Probably the Best Tool for Sprite Edits
-Free
Cons:
-While using the pencil, paintbrush, or eraser tool, if you hold the tool down by left clicking and then using the scroll wheel on your mouse, it will draw a line that cannot be undone.
-when you use the eye dropper tool, when you try and grab a color into your primary color you of course left click, but, what I stress to you DO NOT, while holding the left click mouse button with the eyedropper tool, right click at the same time! It will completely undo your last change and you can't Redo it! (Thanks, Percei!)
Used by: Lynx, Shadoninja, Percei, Super Judge Bro
Tips: -So, say you have a sprite with three colors (Bright, Medium, and Dark, same configuration on almost all PW1-3 Sprites, not so much on GS4 sprites), but it's all spread out across the outfit, well first things first, find the color you want for each of the three colors (I will usually get it from another outfit from a sprite I have C&Ped elsewhere on the canvas), using the eyedropper tool, put the color you want in the Primary Color Box, and the color you want to replace in the Secondary Color Box. Using the box select tool, drag out a square around the outfit of the sprite's outfit, and then press Ctrl-X and your outfit will dissappear, FRET NOT! Now, click the bucket fill tool and fill the box of color that was left from the Ctrl-Xing (Left Click). Then press Crtl-V and drag the pasted sprite over the box of color, make sure the box is completely gone. Just repeat this process for your other two colors and Voila, a brand new outfit (Note this doesn't work with every sprite.)(Also Note: You can do this with skin recolor usually, but not so much on hair, maybe a few hairstyles though.)
-Put the color that you want the originial color to change to as the secondary color (right mouse button) and the color you want to change from as the left mouse button/primary color, you can just hold the RMB and run it over the picture using the eraser to completely recolor.
(thanks, Shadoninja!)
--GIMP--
Pros:
-Free
-Uses Layers to Help with Easy Editing/Re-Editing
-Small Learning Curve for the Tools
-Open Source
-Supports Nearly Every Image Type
-Simple Animation, with Adjustable Frame Rates
-Numerous Picture and Edit Effects to Play WIth
-Settings Carry Over Everytime You Update
-Used by Numerous People on the Forum.
-Tablet PC Compatible
Cons:
-When First Opened, Numerous Floating Windows
-Larger Learning Curve for Sprites
-Help File is a Seperate Download.
Used by: Donald Serrot, Percei
(Thanks for all of the info, Don!)
--Usenti--
Pros:
-Easy recoloring
Cons:
-.png and .gif support only
-Only 256 colors
Used by: Neon Lemmy Koopa
--Unfreez-- (animator)
Pros:
- Small file size, so that you don't have to download the large Photoshop or Gimp just to animate stuff.
- Completely free.
- Pretty straightforward to animate.
- Allows you to set almost any frame speed.
Cons:
- Requires images to be GIF to be animated, but I guess that isn't much of a problem.
Used by: Super Judge Bro
--Photoshop--
Pros:
-Compatible with a tablet, both pen and eraser side, very useful for rough sketching and planning
-Compatible with very many image formats
-Layers, easier to edit if you have certain things in separate layers
-Very many tutorials for using Photoshop anywhere online, including spriting tutorials
-Comes with ImageReady for animation
Cons:
-Expensive, hard to find "free"
-Takes up a lot of hard drive space, probably not worth the money for someone that just wants to do spriting
Used by: Ellescene
--GraphicsGale--
Pros:
-There's a free edition, and if you really like it, you can choose to pay for the full version
-Layers, easier editting
-Fairly easy to understand and use
-Comes with animation options
-Recoloring tool
Cons:
-Free edition isn't compatible with .gifs
-Some limited options in free edition
Used by: Ellescene, BigFish
--Adobe Fireworks--
Pros:
-easy animation
-simple to use
Cons:
-for larger scale projects (not sprites)
-poor mechanics
Users: Lottie, Yuanfang, Harumi Fey
--Paint.net.--
Pros:
-Free
-Almost as many features as PhotoShop.
-Very easy to understand.
-Supports layers, transparency, etc.
-Pretty good for sprite editing, depending on what settings you have the tools on.
-Very easy to navigate.
Cons:
-More for photo editing than sprite editing, due to some transparency editing things.
-Not as many features as PhotoShop.
-Kinda low on Filters.
Users: Emiga
GIMP Tutuorials
To get the build of GIMP (2.2, arguably the best build of the software) I use in these tutorials, go here, scroll down and follow the instructions for download.
Spoiler: Adding Transparency to Sprites Using GIMP
So, adding transparency to sprites is very easy. All you need for thiss Tutorial is the GIMP. So when you've made your sprite, save it as a .PNG (you can go back and change a file type of a
premade one), this is necessary that it be saved in this format, and it has higher quality than .JPEG or .GIF. Anyway, for our example I'll be using this sprite.
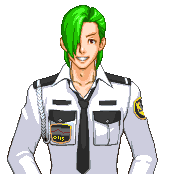
Notice he already has transparency. So let us begin.
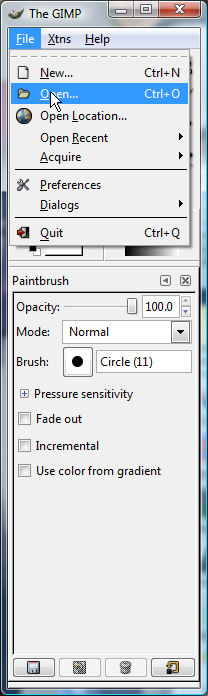 Step 1: Click File->Open
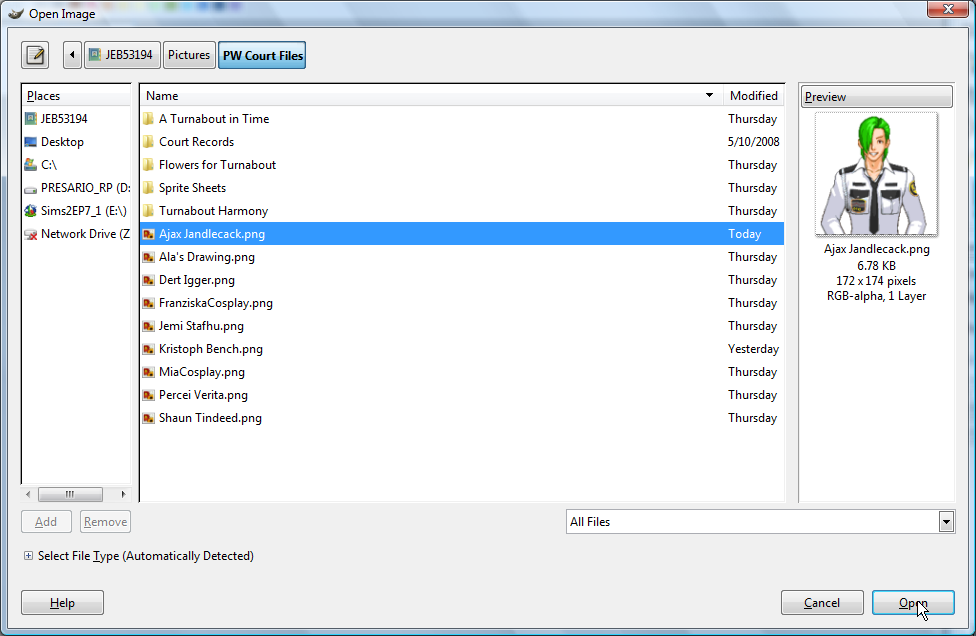 Step 2: Open your sprite that you want to add transparency to.
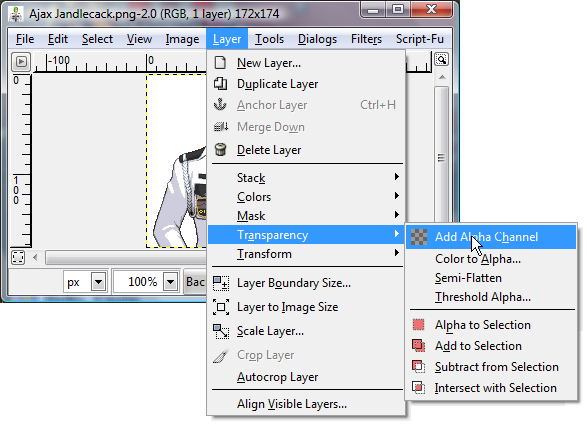 Step 3: Now from the picture window, click Layers->Transparency->Add Alpha Channel. The Alpha Channel is what allows transparency, it is the transparent layer below your picture. (Note: If you have the Layers dialog open, the Alpha Channel doesn't show up on it).
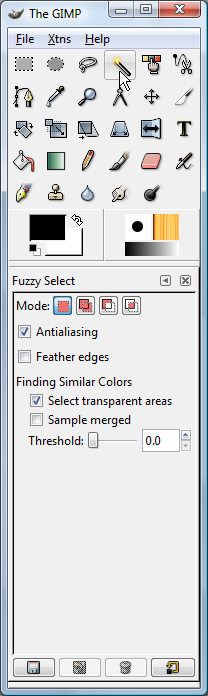 Step 4: Select your wand tool, this selects a single color and of that color touching it.
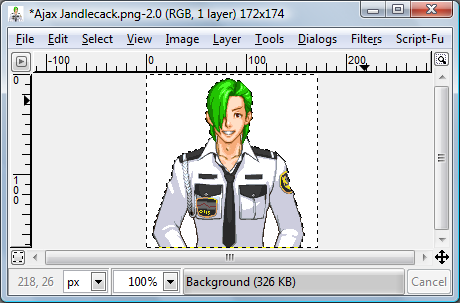 Step 5: Click the white outside your sprite. You'll notice that a moving out line goes around the whole picture and your sprite, the beauty of the magic wand tool.
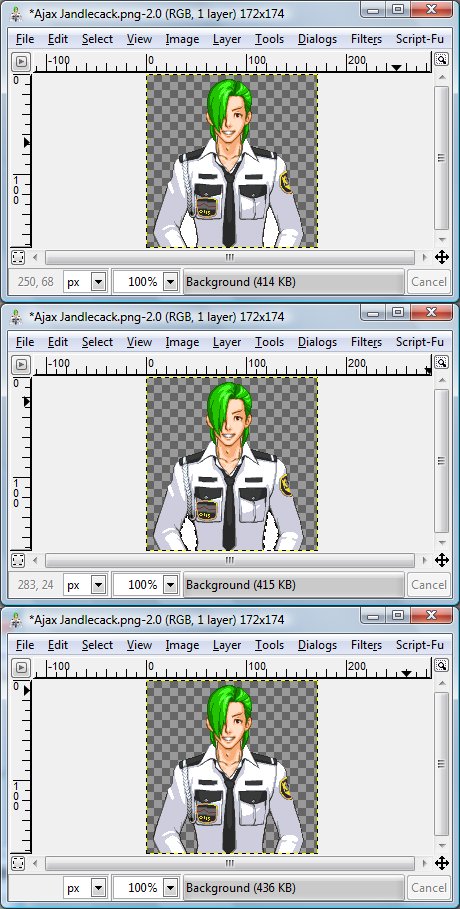 Step 6: Now, press Ctrl-X (Cut) and the white will disappear, leaving you with gray boxes behind your sprite (Thats what signifies transparency!!). Now, say you have a sprite like I do. You now have to delete the other white parts. Did you know that you can highlight all the parts you want gone with a few clicks. To do so, hold shift (and don't release) and click the parts you want to have transparency for, they will all become selected, then press Ctrl-X and they will all disappear (as demonstrated in the second and third boxes of step 6).
You should now have a transparent sprite, if not, double check and make sure you did all the steps, hope this helps .
.
premade one), this is necessary that it be saved in this format, and it has higher quality than .JPEG or .GIF. Anyway, for our example I'll be using this sprite.
Notice he already has transparency. So let us begin.
Step 1: Click File->Open Step 2: Open your sprite that you want to add transparency to. Step 3: Now from the picture window, click Layers->Transparency->Add Alpha Channel. The Alpha Channel is what allows transparency, it is the transparent layer below your picture. (Note: If you have the Layers dialog open, the Alpha Channel doesn't show up on it). Step 4: Select your wand tool, this selects a single color and of that color touching it. Step 5: Click the white outside your sprite. You'll notice that a moving out line goes around the whole picture and your sprite, the beauty of the magic wand tool. Step 6: Now, press Ctrl-X (Cut) and the white will disappear, leaving you with gray boxes behind your sprite (Thats what signifies transparency!!). Now, say you have a sprite like I do. You now have to delete the other white parts. Did you know that you can highlight all the parts you want gone with a few clicks. To do so, hold shift (and don't release) and click the parts you want to have transparency for, they will all become selected, then press Ctrl-X and they will all disappear (as demonstrated in the second and third boxes of step 6).You should now have a transparent sprite, if not, double check and make sure you did all the steps, hope this helps
.Spoiler: Animation, Part 1: Talking and Blinking
HELLO EVERYONE! and welcome to the animation tutorial, today's lesson, talking in blinking sprites. I'm going to be using Isabella Ruby de Killer as an example sprite. Necessary things for this are:
-A Sprite (DUR)
-A Sheet for said sprite. (Not a full one, but it needs to contain the two mouth positions, and the closed and halfway closed eyes.)
-A Bit of Familiarity With the GIMP
-Patience
Once you have all those, we can get right down to it, I'm gonna show you how to turn into
into  .
.
Lets get started!
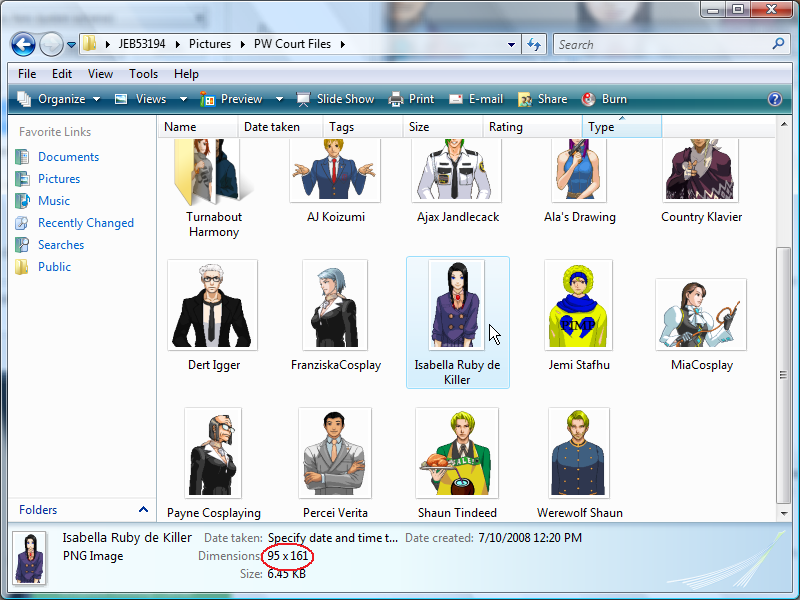
Step 1: Well, first select the sprite you wish to animate, I've chosen Isabella here. Then, look down at the dimensions (which I've circled here) jot down those dimensions and then start up the gimp.
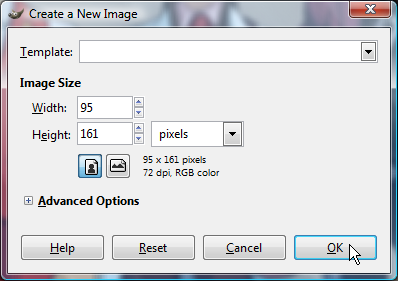
Step 2: From the 'File' menu on the main GIMP toolbar and select 'New...' then enter the dimensions as shown. Then click 'OK'.
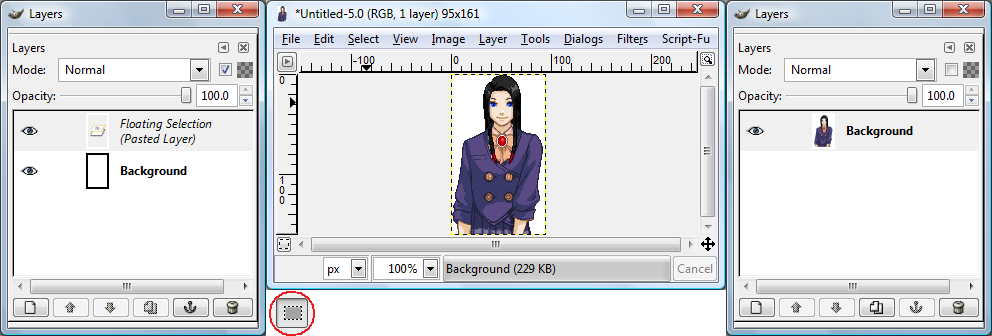
Step 3: Now, if you haven't already, open the Layers dialog (click the Dialogs dropdown menu and then click Layers). Now open your sprite in paint, press Ctrl-A and then Ctrl-C. You can close paint, come back over to your main worksheet (it'll have a block of white on it) and press Ctrl-V. If you look at your Layers window, it will now say 'Floating Section'. You need to anchor this floating section, to anchor a pasted piece of work, click the rectangular select tool (as pictured in the red circle) and click anywhere outside the white area, and voila! Your sprite is now anchored to the background, and the games can begin.
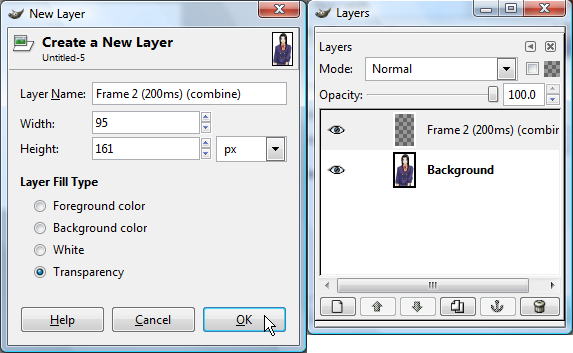
Step 4: Now, it's time to make a new frame. Click the 'Layers' dropdown menu and click 'New Layer', this screen will open up, now name your layer "Frame 2 (200ms) (combine)" and click 'OK'. The (180ms) is the time between the next frame and this one, and the (combine) optimizes the animation. Now you should say your layers screen has changed to include the new layer, now lets move on.
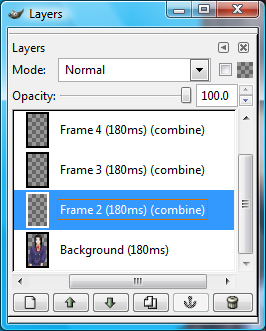
Step 5: Ok, we're going to do a lot of little things in this step. First off add two new layers in the same fashion you did in the last step, only changing the titles to Frame 3 and Frame 4. Next, double click the title of the Background layer and add (200ms) as shown, then press enter. Finally you need to transparentize the background (See: First Tutorial), once you have done so, we can move on to the next step.
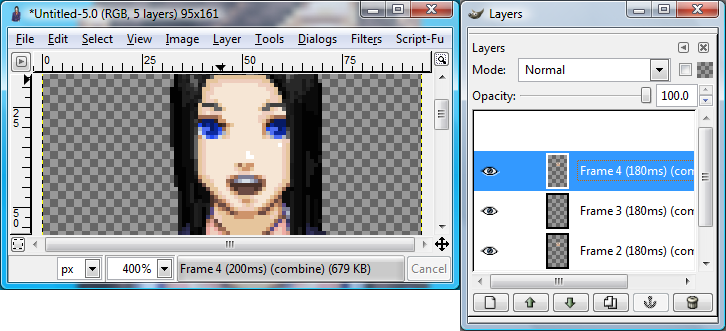
Step 6: OK, now open your sprite sheet (for the sprite you're animating) in Paint, now were going to animate the mouth. So, locate the the wide open mouth talking sprite. Using the select tool, highlight the mouth starting from the bottom of the chin and to the bottom of the nose. Then press Ctrl-C. Now, go to your layers screen and click Frame 2, it should be highlighted in blue (as frame 4 is in this example). Before you do anything, zoom in by 400% (the dropdown menu near the bottom-middle of the work area). Now, go to the main workspace and press Ctrl-V. Your mouth will become a floating section, now, move it to where it fits onto the sprite (like I have there) and then anchor it by the same method you used earlier (rectangular select tool, click anywhere in the gray area outside the sprite work section) and your floating piece will be anchored and you'll have something similar to mine. Repeat this process for Frame 4.
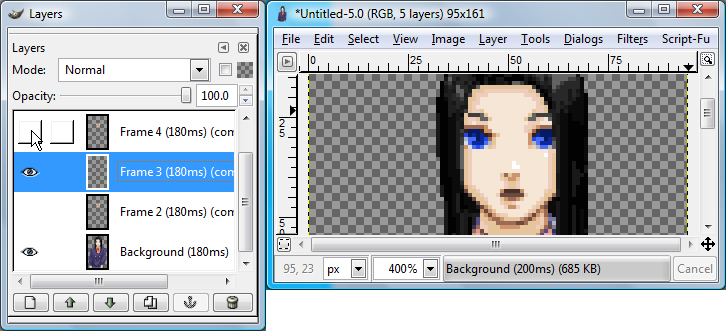
Step 7: Now, your going to have to turn a couple of your layers invisible for a little bit. Do this by pressing the eye button next to the layer picture. Make Frames 2 and 4 invisible. Now, locate the second talking mouth (the smaller open mouth) and repeat the same Copy, Paste, Align, Anchor method from step 4. And your sprite should now have the similar position as mine.
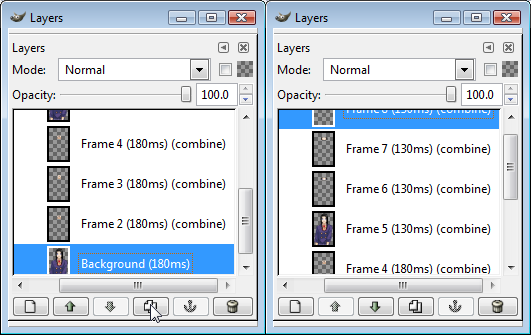
Step 8: You can go ahead and make Frames 2 and 4 visible again. Now, go down to the bottom and highlight the background frame, then click duplicate layer, now move the frame to the top and rename it "Frame 5 (130ms)" just as I have, after that. add 3 more layers, as pictured using the same method as earlier.
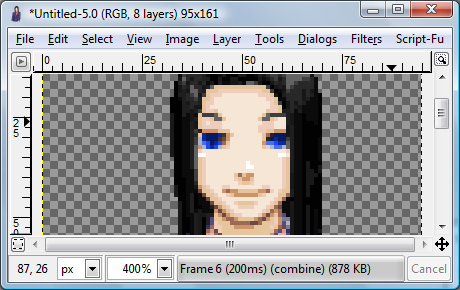
Step 9: Locate the half-closed eyes from your sheet and use the same method from Step 4, doing this on Frame 6 and Frame 8.
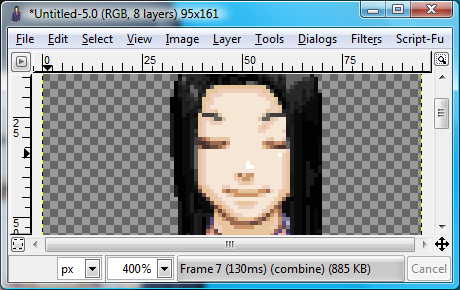
Step 10: Now locate the closed eyes from your sheet and (once again) use the same method from step for, Copying, Pasting, Aligning, and Anchoring to Frame 7.
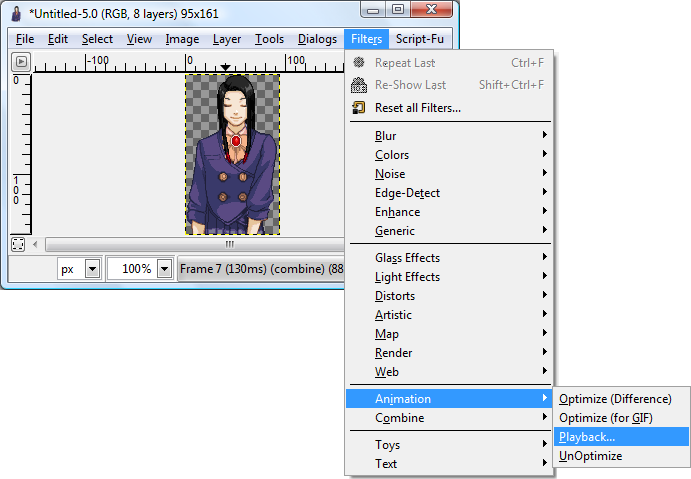
Step 11: Now, you have pretty much finished, you can view your animation by clicking Playback as shown in the dropdown menu. Once you've seen it, you can click 'File' then 'Save'.
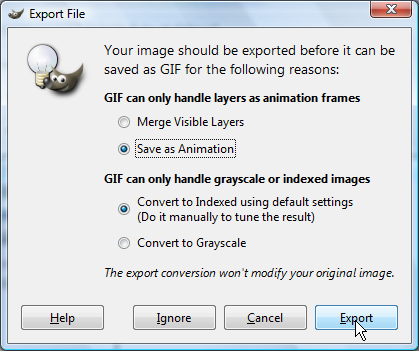
Step 12: Finally click the button 'Save as Animation' on the Next Menu that will come up then click 'OK', another screen will pop up after that, but you can ignore that and just click 'OK'. Congratulations you've just animated a talking/blinking sprite.
-A Sprite (DUR)
-A Sheet for said sprite. (Not a full one, but it needs to contain the two mouth positions, and the closed and halfway closed eyes.)
-A Bit of Familiarity With the GIMP
-Patience
Once you have all those, we can get right down to it, I'm gonna show you how to turn
into .Lets get started!
Step 1: Well, first select the sprite you wish to animate, I've chosen Isabella here. Then, look down at the dimensions (which I've circled here) jot down those dimensions and then start up the gimp.
Step 2: From the 'File' menu on the main GIMP toolbar and select 'New...' then enter the dimensions as shown. Then click 'OK'.
Step 3: Now, if you haven't already, open the Layers dialog (click the Dialogs dropdown menu and then click Layers). Now open your sprite in paint, press Ctrl-A and then Ctrl-C. You can close paint, come back over to your main worksheet (it'll have a block of white on it) and press Ctrl-V. If you look at your Layers window, it will now say 'Floating Section'. You need to anchor this floating section, to anchor a pasted piece of work, click the rectangular select tool (as pictured in the red circle) and click anywhere outside the white area, and voila! Your sprite is now anchored to the background, and the games can begin.
Step 4: Now, it's time to make a new frame. Click the 'Layers' dropdown menu and click 'New Layer', this screen will open up, now name your layer "Frame 2 (200ms) (combine)" and click 'OK'. The (180ms) is the time between the next frame and this one, and the (combine) optimizes the animation. Now you should say your layers screen has changed to include the new layer, now lets move on.
Step 5: Ok, we're going to do a lot of little things in this step. First off add two new layers in the same fashion you did in the last step, only changing the titles to Frame 3 and Frame 4. Next, double click the title of the Background layer and add (200ms) as shown, then press enter. Finally you need to transparentize the background (See: First Tutorial), once you have done so, we can move on to the next step.
Step 6: OK, now open your sprite sheet (for the sprite you're animating) in Paint, now were going to animate the mouth. So, locate the the wide open mouth talking sprite. Using the select tool, highlight the mouth starting from the bottom of the chin and to the bottom of the nose. Then press Ctrl-C. Now, go to your layers screen and click Frame 2, it should be highlighted in blue (as frame 4 is in this example). Before you do anything, zoom in by 400% (the dropdown menu near the bottom-middle of the work area). Now, go to the main workspace and press Ctrl-V. Your mouth will become a floating section, now, move it to where it fits onto the sprite (like I have there) and then anchor it by the same method you used earlier (rectangular select tool, click anywhere in the gray area outside the sprite work section) and your floating piece will be anchored and you'll have something similar to mine. Repeat this process for Frame 4.
Step 7: Now, your going to have to turn a couple of your layers invisible for a little bit. Do this by pressing the eye button next to the layer picture. Make Frames 2 and 4 invisible. Now, locate the second talking mouth (the smaller open mouth) and repeat the same Copy, Paste, Align, Anchor method from step 4. And your sprite should now have the similar position as mine.
Step 8: You can go ahead and make Frames 2 and 4 visible again. Now, go down to the bottom and highlight the background frame, then click duplicate layer, now move the frame to the top and rename it "Frame 5 (130ms)" just as I have, after that. add 3 more layers, as pictured using the same method as earlier.
Step 9: Locate the half-closed eyes from your sheet and use the same method from Step 4, doing this on Frame 6 and Frame 8.
Step 10: Now locate the closed eyes from your sheet and (once again) use the same method from step for, Copying, Pasting, Aligning, and Anchoring to Frame 7.
Step 11: Now, you have pretty much finished, you can view your animation by clicking Playback as shown in the dropdown menu. Once you've seen it, you can click 'File' then 'Save'.
Step 12: Finally click the button 'Save as Animation' on the Next Menu that will come up then click 'OK', another screen will pop up after that, but you can ignore that and just click 'OK'. Congratulations you've just animated a talking/blinking sprite.
Photoshop Tutorials
This is a tutorial on sprite working with Photoshop. Tutorial by Bad Player
Spoiler: How to Edit in Photoshop, and a Basic Imageready Guide
For this tutorial I will be using Photoshop and Imageready 7, since that's the one I have. I'd imagine that it's very similar, if not the same, in other Photoshop versions.
Once you know how to do it, animating is really easy. Because no matter what you're animating--a character moving a limb, shaking his head, or just talking and blinking--you just need this one tutorial! :D
I'm going to be animating the head-shake sprite of my Kristoph knock-off, Roy Alce
Checklist:
-Photoshop and Imageready
-Basic Photoshop knowledge
-Every frame of the animation you want. Whether it's in a sheet or not, it doesn't really matter. Also, I personally prefer the backgrounds to be transparent (that's how people usually post their sprites, anyway). Animation is pretty easy; the hard part is making the sprite....
Onto the tut!!
Step 0 (Sheet-users only): If you have a sheet, cut the frames that you want to use, and put it in photoshop, one sprite for each layer. For the sake of using less memory, and making things easy, use one copy of each frame that you will use. So for instance, if you are going to be making a 20-frame sprite that is 5 repeating sprites, just copy one of each of those 5 sprites, not all 20 sprites.
My sprite is going to have 7 frames, but I only need 4 sprites/layers:
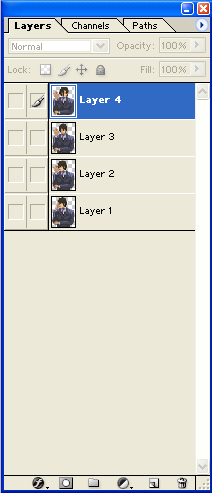
Step 1: Turn the visibility off all your layers, and then transfer your sprite to Imageready.
To transfer to Imageready, just click this button:

This will transfer your file to Imageready, and open Imageready if it isn't already opened.
(Step 1.5: If you are doing a basic sprite, like my head-shake or talking/blinking, and just about all your frames will be the same amount of time, you should do this. In the window that has the frame, click '0 sec' and set it to the time you want all your frames to be. If you're not sure, .2 is a good amount for basic sprites like talking/blinking.
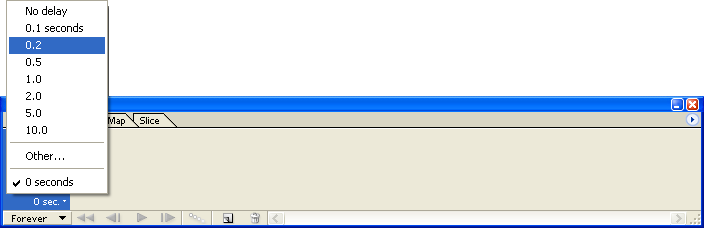
Oh, and even though it says '0 sec' initially, it doesn't play for 0 seconds and skip that frame--it just goes really quickly.)
Step 2: Create frames until you have the number of frames you want. If you don't know, you can just make a few/a bunch now, and then add/delete frames later as you need them.

Step 3: Add in your sprites.
Click on each frame, and then add the sprite you want for that frame. Just start at the first frame, make the sprite for that frame visible, go to the next frame, etc. (For help on which sprites to use in which order for talking/blinking, see end of the tut)
Tangent 1:
When you animate something in Imageready, you can only change 5 things:
1. The position of the image.
2. The opacity of the layer.
3. The visibility of the layer.
4. The visibility of effects on the layer.
5. The blending mode of the layer. (Normal, Overlay, Dissolve, etc)
You cannot change:
1. The composition of the layer. (This includes adding/removing things, and changing the size)
2. The composition of the effects of the layer.
Tangent 2:
Whenever you change certain things in the first frame, it will be changed for every frame. This is important for when you work on the first frame of your animation.
The things that will change in other frames are those 5 things in the first list of Tangent 1. So if you set the opacity of a layer in frame 1 to 70% and blending mode to overlay, that layer will be like that for all frames. However, there is one exception: changing position. It doesn't change the location in other frames to where you moved it, but how you moved it.
Let's say that Layer A in Frame 2 is 5 pixels to the right of Layer A in Frame 1. If you move Layer A up 5 pixels in Frame 1, it will only be moved 5 pixels up in Frame 2, and they will still be exactly 5 pixels apart, not in the same position.
So when you make the sprite in the first frame visible, you will need to go back and make it invisible in all the other frames.
Anyway, back on topic. You should now have this:

Except with your number of frames, your duration of each frame, and your sprites.
Step 4: Edit the duration of each frame.
Now, if you did talking/blinking, or something like that, and did step 1.5, you barely need to do anything! But if you do have a sprite like that, and you didn't... you need to go through each frame and set the time. You also need to do this if you have a sprite that uses different timings for each frame. Just click the 'X sec' and pick the time you want! (Or enter in your own if it's not there.)
Because this headshake would not loop if it were in a game, I am going to extend the last frame to .5 seconds in order to split each loop of the sprite.
Step 5: Check the animation.
Just hit the play button near the frames to watch your animation. Make sure it's okay, and make any necessary adjustments. If you need to edit the composition of a sprite for whatever reason, go back to Photoshop. Except for the fact that it can't animate, Photoshop is better than Imageready in almost every way.
Step 6: Optimize the animation.
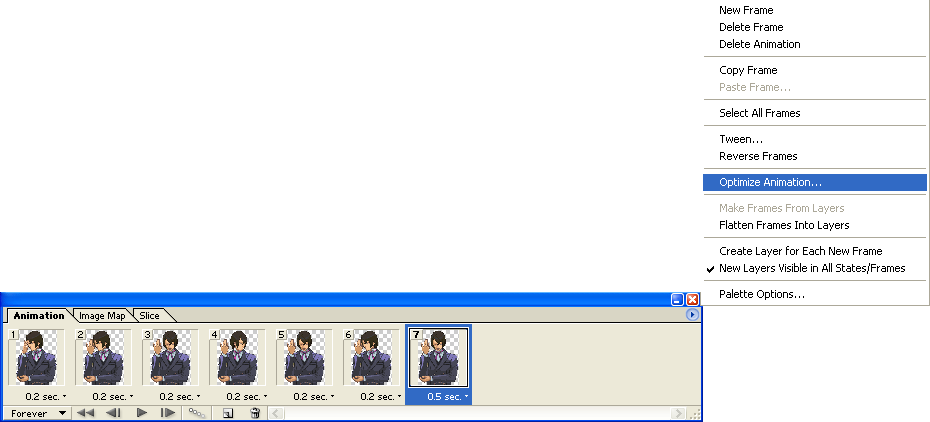
Click the little blue arrow, and optimize! Just make sure the 2 things are selected in the box that comes up and press OK.
This will not have an immediate effects. However, if you skip this step, your animation will decrease in quality when you save it!
Step 7: Save!!!!
File --> Save Optimized As, and you're done! Just make sure to save it as a gif.
And ! You have animation!!

Tips for talking/blinking: There are really 2 main ways to animate the sprite. You can do it either way you like.
I will tell you what to do for each frame, in this format:
Frame #: Duration of Frame in seconds/Mouth position/Eye position
For the mouth and eye position, C is for Closed, O is for Open, and H is for Half-Closed/Half-Open (whichever floats your boat)
Way 1: Talk, blink, talk, blink. This is the way most AJ sprites are displayed on CR.
1: .2/C/O
2: .2/O/O
3: .2/H/O
4: .2/C/H
5: .2/C/C
6: .2/C/H
Way 2: Blink while continuously talking. This is the way most PW sprites are displayed on PW, and my personal preference.
1: .15/C/O
2: .15/O/O
3: .15/H/O
4: .15/O/O
5: .15/C/O
6: .15/O/O
7: .15/H/O
8: .15/O/O
9: .1/C/H
10: .05/C/C
11: .05/O/C
12: .1/O/H
13: .15/H/O
14: .15/O/O
15: .15/C/O
16: .15/O/O
17: .15/H/O
18: .15/O/O
19: .15/C/O
20: .15/O/O
21: .15/H/O
22: .15/O/O
Also, a little trick: Instead of making whole new sprites for each combination of open/closed eyes and mouths, just make 5 layers: one layer that has the entire sprite, with the eyes open and the mouth closed, one layer that is just the sprite's chin with the open mouth, one layer that is just the sprite's chin with the half-open mouth, one layer that is just the sprite's eyes half-closed, and one layer that is just the sprite's eyes closed. When you make your animation, just keep that first layer visible at all times, and just change the visibility of the mouth and eye layers that you need on each frame!
Once you know how to do it, animating is really easy. Because no matter what you're animating--a character moving a limb, shaking his head, or just talking and blinking--you just need this one tutorial! :D
I'm going to be animating the head-shake sprite of my Kristoph knock-off, Roy Alce
Checklist:
-Photoshop and Imageready
-Basic Photoshop knowledge
-Every frame of the animation you want. Whether it's in a sheet or not, it doesn't really matter. Also, I personally prefer the backgrounds to be transparent (that's how people usually post their sprites, anyway). Animation is pretty easy; the hard part is making the sprite....
Onto the tut!!
Step 0 (Sheet-users only): If you have a sheet, cut the frames that you want to use, and put it in photoshop, one sprite for each layer. For the sake of using less memory, and making things easy, use one copy of each frame that you will use. So for instance, if you are going to be making a 20-frame sprite that is 5 repeating sprites, just copy one of each of those 5 sprites, not all 20 sprites.
My sprite is going to have 7 frames, but I only need 4 sprites/layers:
Step 1: Turn the visibility off all your layers, and then transfer your sprite to Imageready.
To transfer to Imageready, just click this button:
This will transfer your file to Imageready, and open Imageready if it isn't already opened.
(Step 1.5: If you are doing a basic sprite, like my head-shake or talking/blinking, and just about all your frames will be the same amount of time, you should do this. In the window that has the frame, click '0 sec' and set it to the time you want all your frames to be. If you're not sure, .2 is a good amount for basic sprites like talking/blinking.
Oh, and even though it says '0 sec' initially, it doesn't play for 0 seconds and skip that frame--it just goes really quickly.)
Step 2: Create frames until you have the number of frames you want. If you don't know, you can just make a few/a bunch now, and then add/delete frames later as you need them.
Step 3: Add in your sprites.
Click on each frame, and then add the sprite you want for that frame. Just start at the first frame, make the sprite for that frame visible, go to the next frame, etc. (For help on which sprites to use in which order for talking/blinking, see end of the tut)
Tangent 1:
When you animate something in Imageready, you can only change 5 things:
1. The position of the image.
2. The opacity of the layer.
3. The visibility of the layer.
4. The visibility of effects on the layer.
5. The blending mode of the layer. (Normal, Overlay, Dissolve, etc)
You cannot change:
1. The composition of the layer. (This includes adding/removing things, and changing the size)
2. The composition of the effects of the layer.
Tangent 2:
Whenever you change certain things in the first frame, it will be changed for every frame. This is important for when you work on the first frame of your animation.
The things that will change in other frames are those 5 things in the first list of Tangent 1. So if you set the opacity of a layer in frame 1 to 70% and blending mode to overlay, that layer will be like that for all frames. However, there is one exception: changing position. It doesn't change the location in other frames to where you moved it, but how you moved it.
Let's say that Layer A in Frame 2 is 5 pixels to the right of Layer A in Frame 1. If you move Layer A up 5 pixels in Frame 1, it will only be moved 5 pixels up in Frame 2, and they will still be exactly 5 pixels apart, not in the same position.
So when you make the sprite in the first frame visible, you will need to go back and make it invisible in all the other frames.
Anyway, back on topic. You should now have this:
Except with your number of frames, your duration of each frame, and your sprites.
Step 4: Edit the duration of each frame.
Now, if you did talking/blinking, or something like that, and did step 1.5, you barely need to do anything! But if you do have a sprite like that, and you didn't... you need to go through each frame and set the time. You also need to do this if you have a sprite that uses different timings for each frame. Just click the 'X sec' and pick the time you want! (Or enter in your own if it's not there.)
Because this headshake would not loop if it were in a game, I am going to extend the last frame to .5 seconds in order to split each loop of the sprite.
Step 5: Check the animation.
Just hit the play button near the frames to watch your animation. Make sure it's okay, and make any necessary adjustments. If you need to edit the composition of a sprite for whatever reason, go back to Photoshop. Except for the fact that it can't animate, Photoshop is better than Imageready in almost every way.
Step 6: Optimize the animation.
Click the little blue arrow, and optimize! Just make sure the 2 things are selected in the box that comes up and press OK.
This will not have an immediate effects. However, if you skip this step, your animation will decrease in quality when you save it!
Step 7: Save!!!!
File --> Save Optimized As, and you're done! Just make sure to save it as a gif.
And
! You have animation!!Tips for talking/blinking: There are really 2 main ways to animate the sprite. You can do it either way you like.
I will tell you what to do for each frame, in this format:
Frame #: Duration of Frame in seconds/Mouth position/Eye position
For the mouth and eye position, C is for Closed, O is for Open, and H is for Half-Closed/Half-Open (whichever floats your boat)
Way 1: Talk, blink, talk, blink. This is the way most AJ sprites are displayed on CR.
1: .2/C/O
2: .2/O/O
3: .2/H/O
4: .2/C/H
5: .2/C/C
6: .2/C/H
Way 2: Blink while continuously talking. This is the way most PW sprites are displayed on PW, and my personal preference.
1: .15/C/O
2: .15/O/O
3: .15/H/O
4: .15/O/O
5: .15/C/O
6: .15/O/O
7: .15/H/O
8: .15/O/O
9: .1/C/H
10: .05/C/C
11: .05/O/C
12: .1/O/H
13: .15/H/O
14: .15/O/O
15: .15/C/O
16: .15/O/O
17: .15/H/O
18: .15/O/O
19: .15/C/O
20: .15/O/O
21: .15/H/O
22: .15/O/O
Also, a little trick: Instead of making whole new sprites for each combination of open/closed eyes and mouths, just make 5 layers: one layer that has the entire sprite, with the eyes open and the mouth closed, one layer that is just the sprite's chin with the open mouth, one layer that is just the sprite's chin with the half-open mouth, one layer that is just the sprite's eyes half-closed, and one layer that is just the sprite's eyes closed. When you make your animation, just keep that first layer visible at all times, and just change the visibility of the mouth and eye layers that you need on each frame!











 can somebody tell me and PLEEEEEEEEEEEASEEEEEEE DONT IGNORE MEEEEEEEEEEEEEEEEEEEEEEEEEEEEEEEEEEEEEEEEEEEE!!!!!!!!!!!










 Lamiroir (Made from Thelasa's head, and just putting the scarf on)